Setting up practitioner profile
Profile creation
Practitioners create their profile on the healee-md platform via the following few steps:
- Enter a valid email address
- Set up their password (usually min. 8 characters required)
- Complete the essential information fields
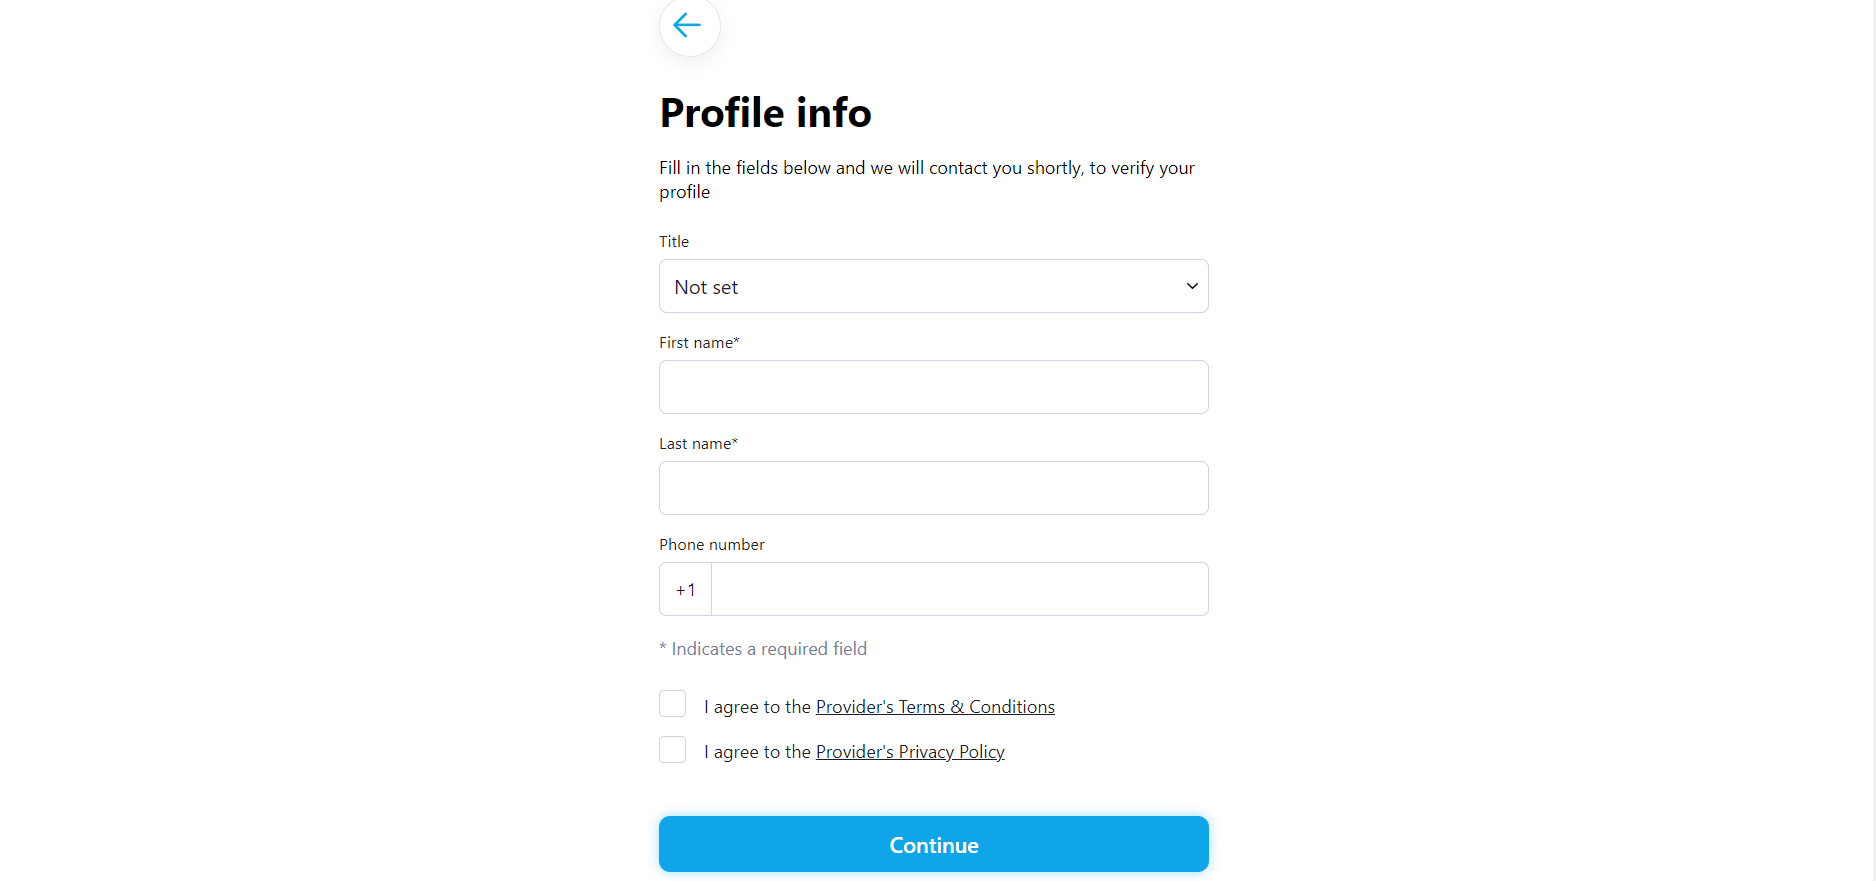
Once their account is created they can log in and add information regarding their photo, title, experience, specialties, bio & background, etc.
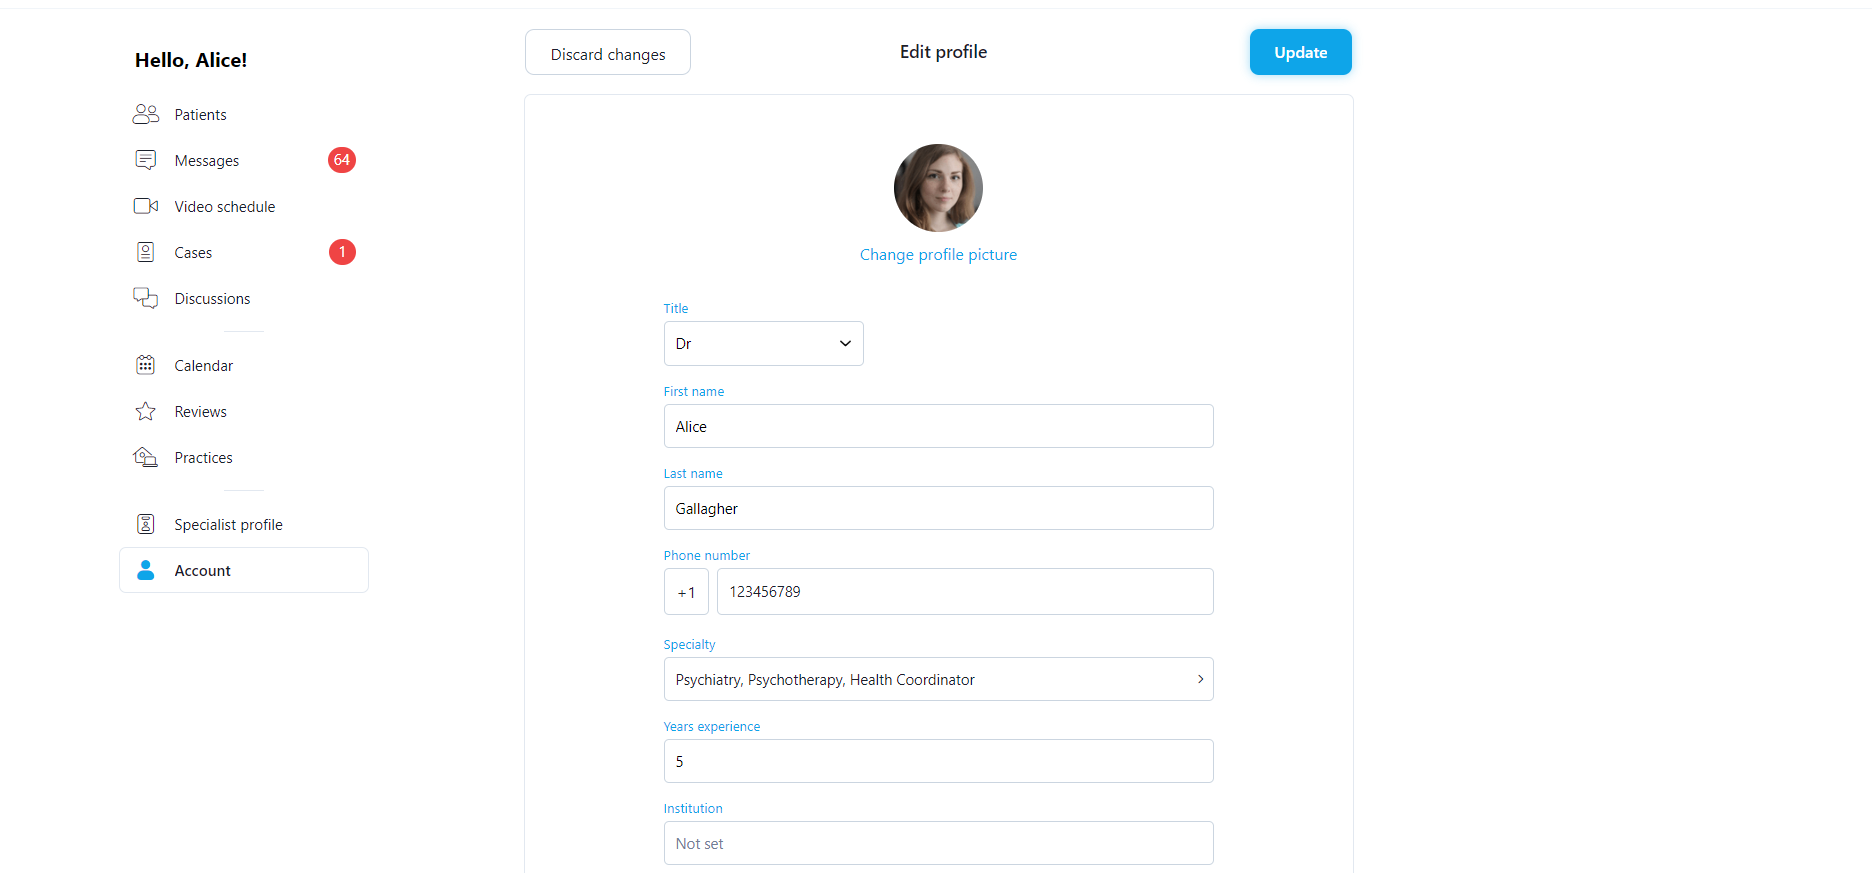
Profile editing
Once the practitioner's profile has been created, they can always log in and make desired modifications via the Specialist Practice section or Account ➝ Edit.
Practice creation
“Practice” stands for the practitioner’s schedule at each of their working places. For instance, if a practitioner is employed at a general hospital on even days, this constitutes a practice. If that practitioner also has their own private practice on odd days, this is a second practice. A practitioner can have as many practices as they want as long as their working hours do not overlap.
How to set up a practice
There are three types of practices a practitioner or scheduling admin can create:
- Video - online consultations. This practice can be valid for both audio and video calls conducted in the telehealth component
- In-person - face-to-face consultations at a physical location
- Home visits - a practitioner is going to the patient’s house
The practitioner is requested to enter information about the practice such as: address, phone number, reasons for visit, accepted payment method/s, prices, etc. Some of the fields are required while others are optional.
Here are some further details regarding the fields to be completed.
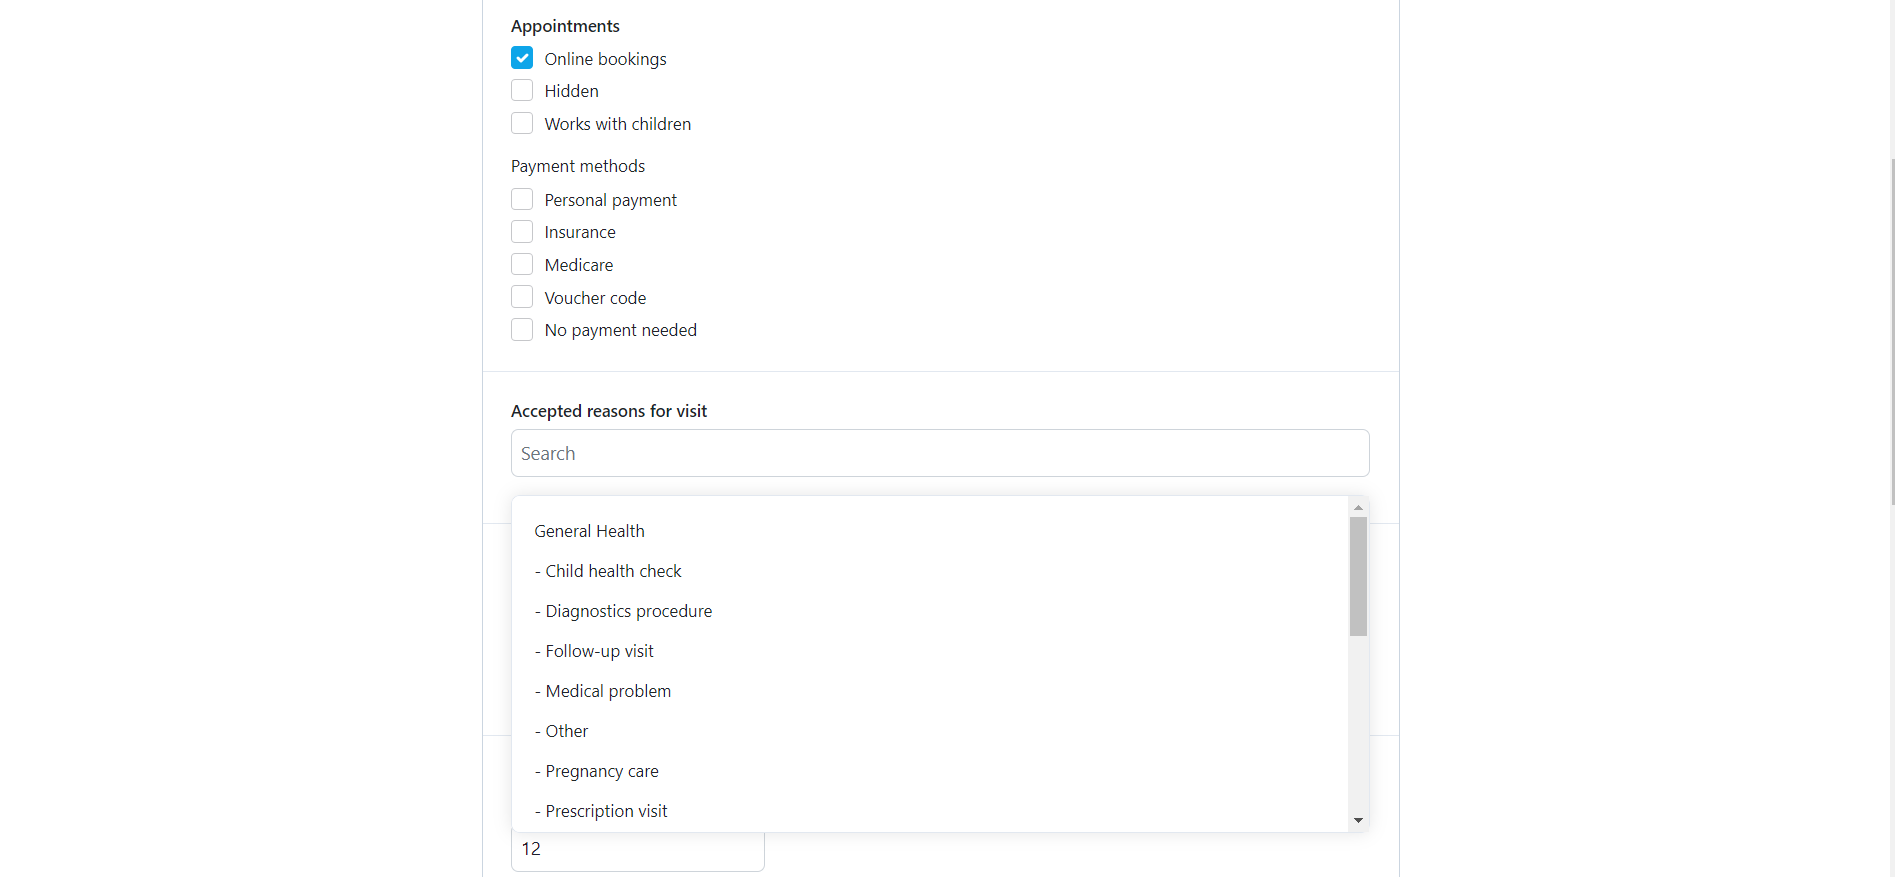
- Appointments
- Online bookings - keeps the practice visible to patients but does not allow them to book. Practitioners also cannot book on behalf of patients.
- Hidden - hides the practice from patients. Only the practitioner can book on their behalf.
- Works with children - selecting this will make it visible to patients.
- Payment methods
- Cash/personal payment - allows the patient to pay out of pocket.
- Private insurer - if selected, you will also need to choose at least one insurer company from the list. An admin can add new insurers via the scheduling app admin should it be requested.
- Public insurer
- Accepted reasons for visit (naming can vary and the platform-wide list is added from the scheduling app admin.
- The practitioner can have many types of appointments for different reasons, e.g. medical problem, follow-up, vaccination, etc. To add a reason for visit use the search bar and select the entry you want. You can also define, for each separate reason:
- Popular - defines whether the reason shows up above the rest in a new category (“Popular”) whereas the rest of the reasons are ordered alphabetically below
- Duration - how long the appointment will take
- Price - how much it will cost
- Days - The practitioner can choose when a certain type of visit is applicable. For instance, the practitioner might perform vaccinations only on Monday or accept follow-up consultations only on Thursday and Friday.
- Notifications
- Email notification for every appointment - emails for confirmation, rescheduling, cancellation.
- Email notification for every review - email for submitted patient reviews.
- Message notification for every appointment - SMS for confirmation, rescheduling, cancellation.
- Message notification for cancellation on the appointment date - SMS for cancellation.
- Booking
- Earliest possible booking - defines how soon in advance a patient can book. “0” means immediately while “6” hours allow bookings at least 6 hours in advance, depending also on the practitioner’s availability. Metric: hours or days.
- Latest possible booking - indicates how many months in advance an appointment can be booked. Metric: months.
- Additional information (visible under your calendar) - if there is any additional info to the booking, it can be added here. This text is displayed below the practitioner’s calendar.
- Appointment guide (visible at the time of booking) - instructions to the patient that are visible on the last page of the booking process.
- Warning before booking - this can only be set in the scheduling app admin. It is a pop-up that appears to the patient when they select a time slot from the practitioner’s calendar.
- Professional Fees - displays fees under the practitioner’s calendar, visible to the patient. These are not tied to a payment in the system but can give the patient an idea about the doctor’s fees. For instance, a reason for visit could be initial consultation, and the fees might indicate to the patient that during this consultation, they will be charged X amount for Test 1 or X amount for Test 2.
You can rearrange the order in which all practices are displayed on the dashboard by using drag-and-drop. This also determines the order in which they will be displayed to patients.
Working hours
Add working hours to a practice
Practitioners set-up their working schedule through My practices ➝ Working hours.
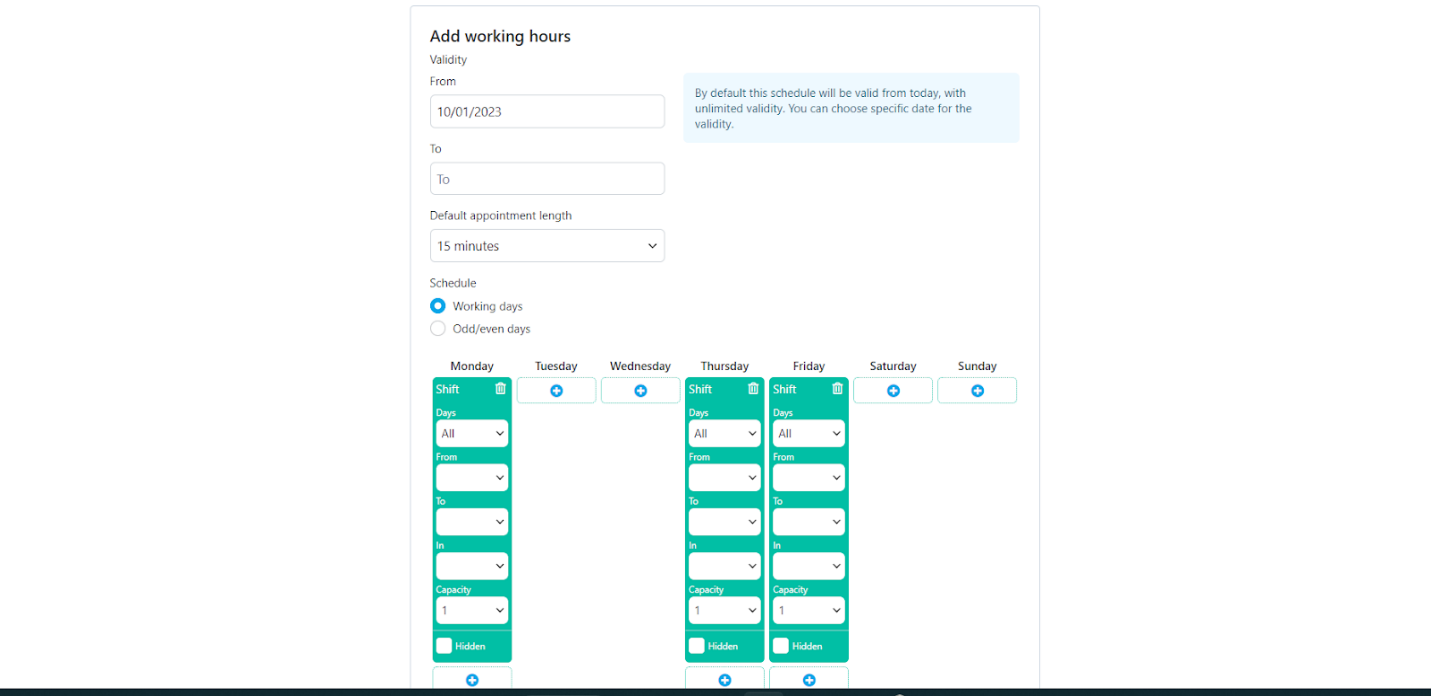
Parameters
- Validity - limit the time validity of your working hours (schedule) by entering an ending date. If you leave the field blank, your working hours will perpetually remain the same. You can still change them later on by using the “Split” option.
- Default appointment length - set the default duration. This can be overwritten by the duration set per reason for visit. If you have not set a duration there, the reason for visit will automatically assume the default appointment length.
Example:
Reason for visit = no set duration Default appointment length = 30 minutes Selected reason for visit will result in a 30-minute appointment.
Reason for visit = 30-minute duration Default appointment length = 15 minutes Selected reason for visit will result in the system aggregating two time slots (2 x 15 minutes) in order to accommodate the duration of the reason
Reason for visit = 30-minute duration Default appointment length = 20 minutes Selected reason for visit will result in the system aggregating two time slots (2 x 20 minutes), but the extra 10 minutes from the second time slot will not count towards the patient’s consultation. Instead, the practitioner can use them for their break between appointments
- Schedule
- Select “Working days” (entire 7-day week) or “Odd/even days”.
- Click the "+" sign on all your working days and day by day select the duration of your shifts. You can add more than one shift per day but your shifts cannot overlap with each other or with those of your other practices. You can leave unset slots between the shifts for breaks.
- Capacity - determines whether more than one patient can book the same timeslot.
Example: Capacity = 3 Free time slot = 9 a.m. 3 different patients can book that 9 a.m. time slot
- If this is an in-person practice, you can choose which shifts are “in-person", “video” or both.
- If this is a home visits practice, you can choose which shifts are “home visits”, “video” or both.
- For video practices, there is no such selection - the shifts are only “video”.
- Hidden - In case you do not want the shift to be visible to patients.
Change an existing schedule
Should the practitioner need to make changes to their schedule they should follow the below steps:
- Split - split a currently live schedule and set a new one. Your settings will be copied. Always select a date in the future.
- Copy to new - copy a schedule and its settings. Always select a date in the future.
Whenever the current date falls in the from-to period of the validity, the working hours cannot be changed. In order to edit a calendar in this case, its starting date needs to be in the future.
Edit shifts for a specific day only
For various reasons a practitioner might want to update a specific day's schedule or block the entire day.
- To block (turn off) a day, go to "Calendar", click the name of the day and select "Turn off this day". Turning off a day will automatically delete all active appointments. Before a planned leave, make sure that you have turned off your days in advance.
- To create a schedule for a non-working day - go to “Calendar”, click the specific date, click “Edit” and set up your shift/s.
- To copy the schedule from another working day - go to “Calendar”, click the date you wish to copy from, click “Copy” and paste it to the non-working day by clicking its date and then “Paste from…”.
- To edit the shift/s of a working day, click the date, click "Edit", set, and save.
If you need to edit a day or a few, do it from the "Calendar" section. If your schedule will change significantly, set up new working hours from "Practices”.
Away schedule & message
Practitioners can set their availability in their profile page via ➝ Account ➝ Availability status.
Setting the practitioner's availability to Away entails blocking of incoming notifications for a certain period of time. The duration is customizable.
The practitioner can leave a custom away message to their patients in that same section.
Practitioners have the option to set an away schedule. While the above case is applicable to intermittent periods of time, the away schedule is rather used to address successive modifications to the schedule. If the practitioner desires to pause messages during weekends, they can turn on the corresponding toggle switch.
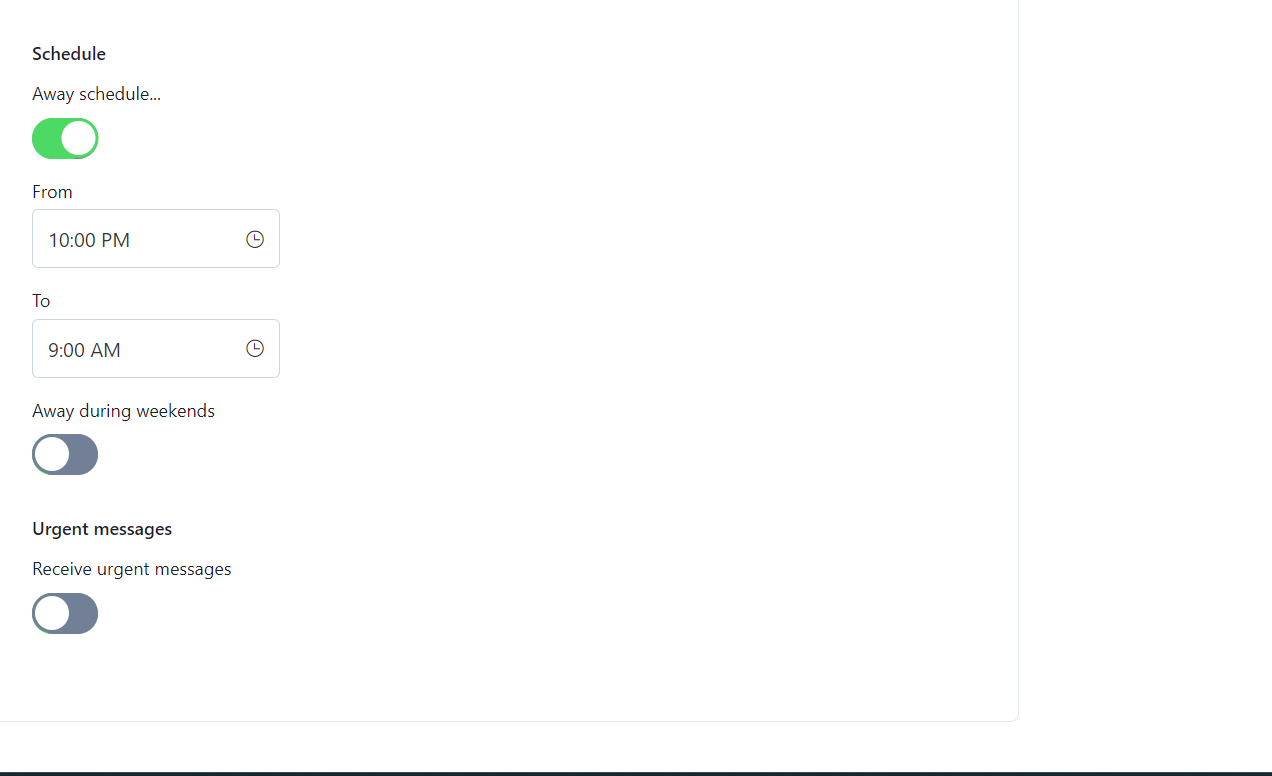
For all Away cases: If the practitioner wants to receive urgent notifications from patients while in Away mode, they should turn on the Receive urgent messages toggle switch. When the patient sends a message in the thread, they would see a pop up-asking them whether they'd like to mark it as urgent. If they select that option, the practitioner will get a notification.
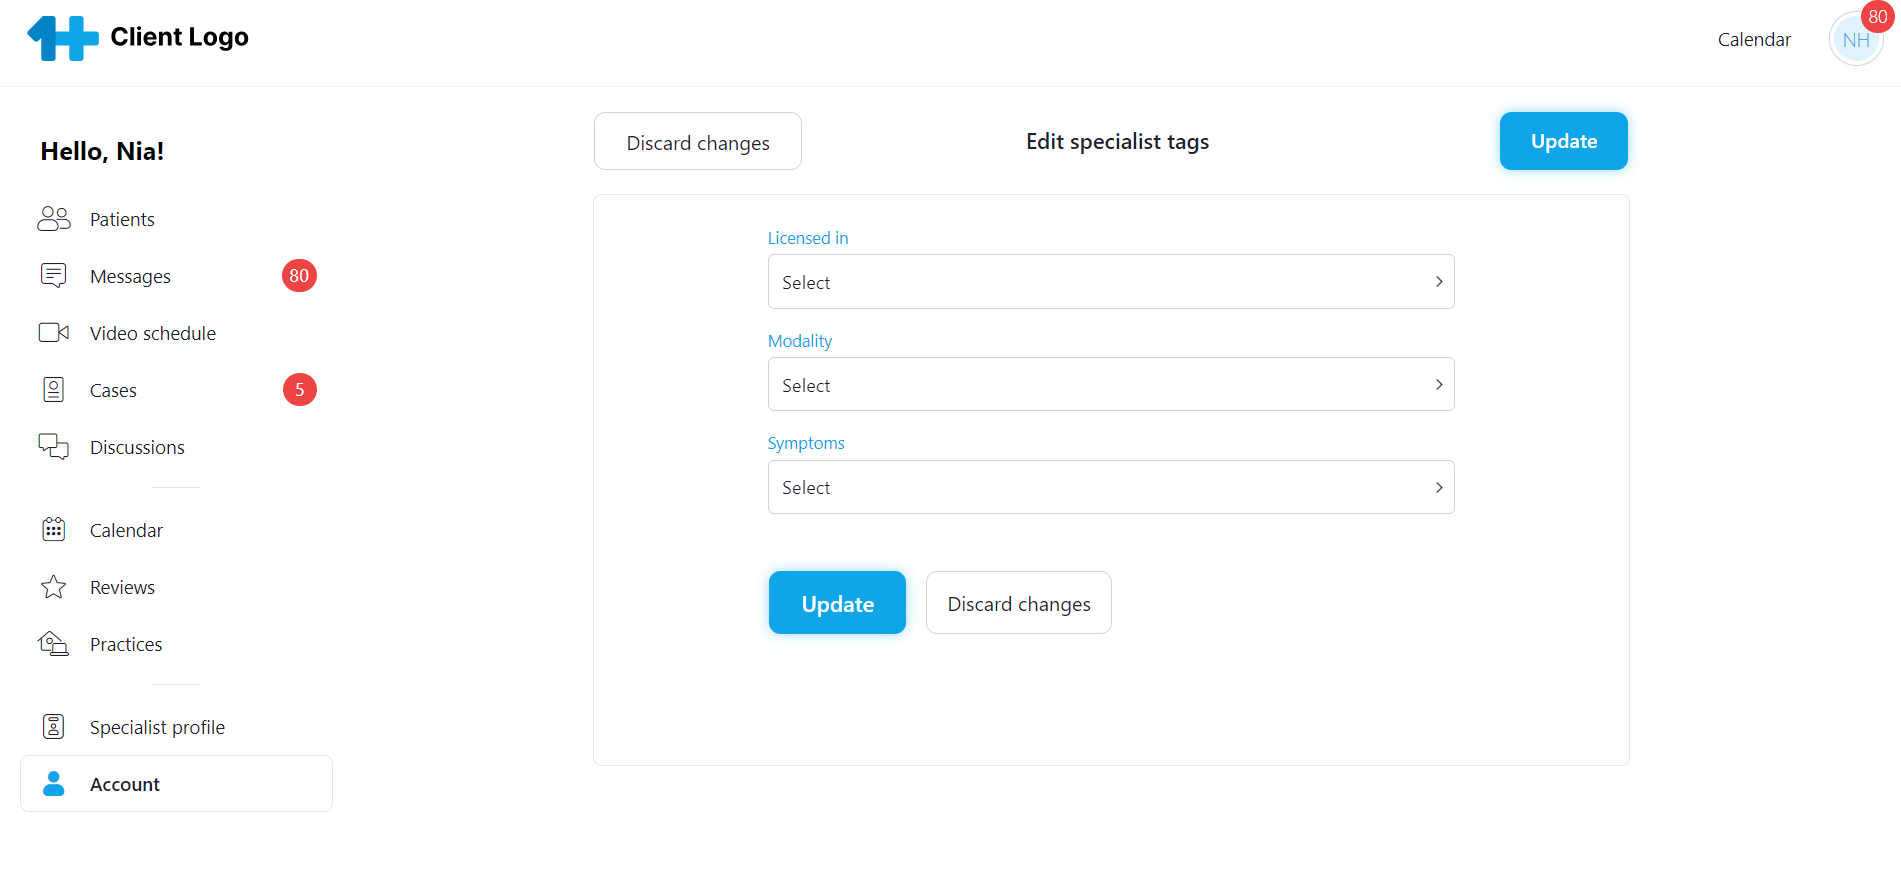
Tags
Tags are customizable parameters used for the patient-practitioner matching (if any is requested). During the matching phase patients may be asked to enter some specific information to help refine the suggested list of practitioners. On the practitioner's side, the tags are added in the Account ➝ Tags section.
In the below screenshot there are three types of tag groups - Licensed in (referring to the state the practitioner offers their services), Modality (type of sessions they offer), Symptoms (symptoms they are able to offer treatment for). As mentioned previously the tags can be modified to address different requirements related to the patient journey.
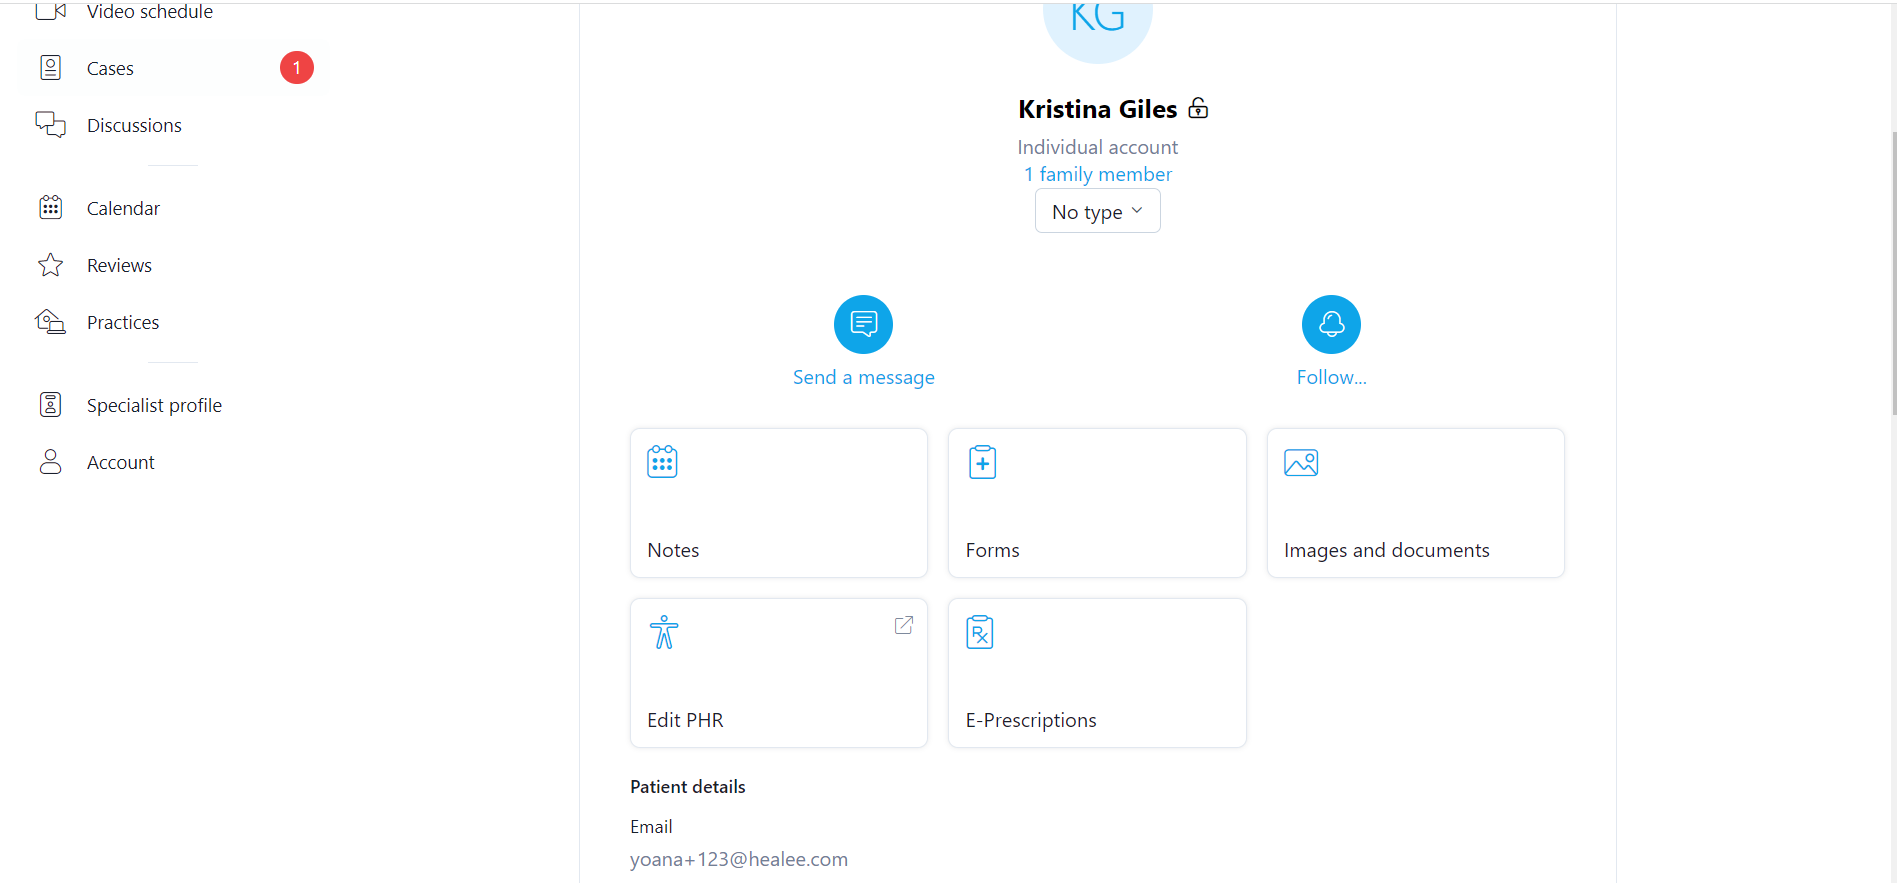
Patient section
Patient details are accessed via the All patients tab in the practitioner profile. Clicking on any name will take the specialist to the corresponding profile. In the latter are displayed:
- Patient basic details (name, phone number, date of birth, family members if any are tied to the account, etc.)
- Several sections namely:
- Notes
- Forms
- Images & Documents
- Other health data
The Notes section contains simply formatted text notes created & edited by the practitioner for a certain patient. These documents are private to the specialist and are not shared with the patient. The practitioner can edit the notes at any time - the date stamp of the latest changes will be marked within each note.
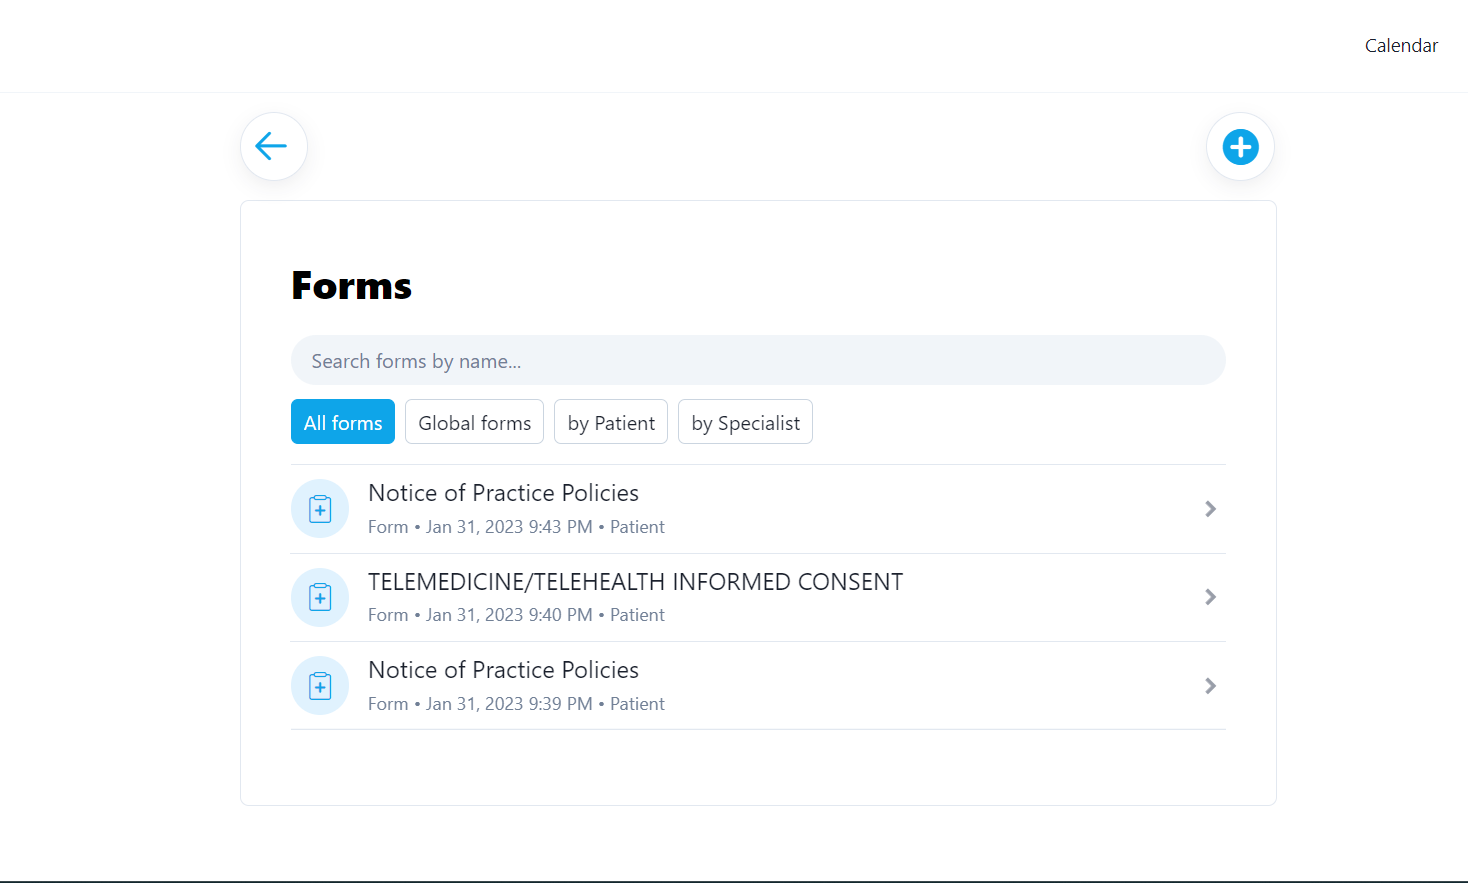
The Forms section displays all forms that have been filled either by the patient, or by the practitioner. There exist two types of forms - intake or patient notes (submitted by patients) and provider/note forms (completed and submitted by the practitioner within a given patient's profile). The provider forms can be shared with the patient or be private depending on the practitioner's preferences. For easier search the practitioner can apply filtering (see below).
Some additional action buttons allow practitioners to:
- Send the patient to another specialist in case they are not able to help
- Add patients to custom created groups
- Discharge a patient in case their treatment has been completed or for other circumstances that assume cease of the communication between the two
- Delete a patient from their patients list
Practitioners can further do the following via the chat thread with the patient:
- Define and send diagnosis using a ready-made template
- Write and send free text diagnosis
- Prescribe medications via a ready-made template
- Recommend an in-person specialist visit when diagnosis or treatment cannot be made via telehealth. Patient's card is not charged in that case.
- Use the I cannot help function - patient's card is not charged in that case